
Revit Architecture: Basics – Roof
In this exercise I will explain the very basics of creating a Revit roof. The roof tools is fairly easy to use however there are alot of possibilities that you can create once you move on from the basics such as dormers.
Revit Architecture Basics
Chapter 8: Roofs (You are here)
Where to find Roof
The Roof button can be found in the “Architecture” tab, in the section called “Build”:
![]()
How to Place a Roof
Roofs can be placed anywhere using the draw tools however they are usually places on top of a structure.
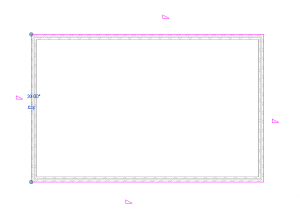
In this example I will place a roof on an existing structure:
- I have previously drawn four walls on level one, I will now go to Level Two in the project browser to create my roof.
- Click the Roof button on the Architecture tab in the ribbon bar.
- Make sure you have the “pick wall” draw tool selected.

- Click on the four walls to draw the outline of the roof.
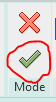
- Click the green tick in the ribbon bar to finish drawing the roof.
Congratulations you have now created a Revit roof.
Tips
- Add an offset to create an overhang.
- When drawing the roof you can choose if a face is defined as sloping in the properties.
- You can also change the angle of the slope.
Conclusion
Revit Roofs are very easy to create and very customisable. Above is the basics but from that you can create most types of roofs and when combining with other tools such as creating a mass and custom surfaces the possibilites become endless.
Revit Architecture Basics
Chapter 8: Roofs (You are here)
Return to Revit Architecture: Basics
Read more about Roofs on the Autodesk Kneowlage Network.